Audi A5 Forum & Audi S5 Forum banner

Coupe memory seat buttons retrofit DIY

70K views 80 replies 32 participants last post by  Kapur  
#1 ·
Ok, following several requests here's the brief DIY on retrofitting the driver's seat memory panel in the door. This will enable two directly accessible memorized seat positions (not via key fob as discussed many times before).

Note: this DIY is for LHD A5 Coupe equipped with driver's seat memory module J136 (check its presence using VAG-COM beforehand).

Parts required:

8T0 959 769 V10 seat memory panel E97 (LHD driver side) 1 pcs.
8T1 959 527 A7PE seat memory panel surrounding frame (LHD driver side) 1 pcs.
8L0 971 883 connector T8x 1 pcs.
000 979 009 E connector wire 7 pcs.
7L6 868 243 spare door panel clip 3-5 pcs.

If the car doesn't have J136 memory module, it has to be also installed.

Tools required:

VAG 3409 plastic wedge
VAG 3392 panel pliers
torx screwdriver
soldering iron / insulation tape
VAG-COM

I strongly recommend using wedge and pliers, otherwise it's extremely easy to damage the door trim.

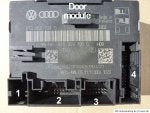
Basically, the task is to install the seat memory button panel E97 and connect it to J386 driver's door control module. Perfect instructions on how to do particular steps right may be taken from ELSA shop manual.

The main steps are:

1. Remove door decorative trim using wedge

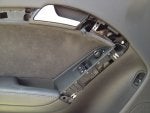
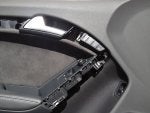
2. Remove door armrest front/bottom trim using wedge and large flat screwdriver. Disconnect wire from door lock switch E150 (pics 1, 2)

3. Undo five screws holding the door panel with torx screwdriver

4. Unclip and remove door panel using pliers (pic 3). If done carefully most clips may be re-used, otherwise replace with spare ones. Disconnect T32j connector (pic 4) and door lock rod

5. Assemble wire harness connecting E97 to J386:

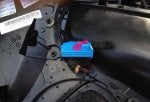
- 6 complete wires (signal) connect T8x on E97 to T32j on J386. Pins 1-17, 2-19, 3-15, 4-14, 7-7, 8-2

- 1 split wire (illumination) from T8x pins 5 and 6 should be connected to door illumination wires (brown and blue/brown). I've chosen to cut in at E150 (pic 5) connector using soldering iron

6. Connect T8x to E97, install E97 in the door panel (pic 6)

7. Put the door panel and decorative trim back in reverse order

8. Install the new seat memory button panel surrounding frame (don't forget to re-connect the E150 switch)

9. Perform some VAG-COM coding:

[42 – Door Elect, Driver]
[Coding - 07]

[Byte 4]

Bit 1 = 1


[36 – Seat Mem. Drvr]

[Coding - 07]

[Byte 2]
Bit 1 = 1

10. Check the memory function according to car manual. Enjoy!
 

Attachments

#3 ·
excellent DIY description.

I have this option ordered from new.
and it surprises me that this memory option only affects the drivers seat.
have not seen a possibility to include the passenger seat in this.

any suggestions ??
 
#5 · (Edited)
Been thinking about that.

The button block and surrounding frame may be taken from RHD version, however I'm not sure if the system can handle TWO memory seats simultaneously.

Honestly, driver's seat was the main target because my wife ocassionally drives the car and it's a PITA to restore the settings without memory buttons later :)
 
#6 ·
Could 1 or number of you guys do some vcds logs for me please, so I can look at some coding for memory seats, working on a car atm & apart from component protection, need to research some stuff aswell, please PM me if you're able to help & I will provide more info on what I would like if thats ok, thanks.
 
#9 ·
Sorry for delay in reply, Adams car was fun to the extreme with lots of surprises for the seat install lol.

I would like please, the long coding & an adaptation controller map for 06, 36, 42, 52, 16, 17, 09, 46 & 5F if thats ok so I can compare some coding.

Ben could you also provide the same info please mate given yours is facelift :)

TIA guys.

Also passenger memory can be fitted afaik, there's a coding option, so I suspect when the module is fitted to the door module & coded it should work, but this may be reliant on a specific door module fro regions that allows such thing, like China, only 1 way to find out, Adam fancy being a guinea pig with existing modules?
 
#10 ·
Great installation, right in line with what I am hoping to do. I want to install a door module on the right hand (passenger side) of my 2012 A5 so my wife has the same functions as the drivers side. Can any members with RH drive tell us the part number for the door module? A RH drive switch model will curve the right way.
Any ideas and indights would be greatly appreciated. Am very hesitant anbout opoerating on may baby. Would hate to mess it up. I still have to confirm what motors and data bus configuration I have on the Pass. side.

Thanks
 
#12 ·
Pass. Seat Memory.

Unfortunately my car is in storage for another month with only one side easily accessable. Can't bear to drive it in winter with all the salt they use on the roads here in Ottawa. Next time I go to start it I will take an inspection mirror and see if I can get some part numbers. Seat module should be easy however the door module will be impossible without removing the panels.
 
#13 ·
Unfortunately my car is in storage for another month with only one side easily accessable. Can't bear to drive it in winter with all the salt they use on the roads here in Ottawa. Next time I go to start it I will take an inspection mirror and see if I can get some part numbers. Seat module should be easy however the door module will be impossible without removing the panels.
No need to disassemble anything. Just get VAG-COM and query corresponding module - among other information you will get the VAG number.
 
#15 ·
Cumberlandjames there may be someone who lives close to you willing to do the adaptation in return alcohol/sexual favours.

In VCDS I have Address 43 Door Elect, Driver (J386) which im assuming is the wrong module, may get a price from Audi direct.
 
#16 ·
Nino,
If I understand it correctly, the J386 module is required for the door, whereas the J136 module controls the seat operation. So you will still need the J386 module.

Tomcat,
I have a J136 drivers mem module (same module number but mine is a right hand drive car) and also a J521 pass seat mem module. Does this mean I could connect the memory seat switches to both sides?
 
#19 ·
Nino,
Tomcat,
I have a J136 drivers mem module (same module number but mine is a right hand drive car) and also a J521 pass seat mem module. Does this mean I could connect the memory seat switches to both sides?
Further to previous, VCDS part no's below. Can anyone help and also advise part no.s for a right hand drive car?

Thanks

-------------------------------------------------------------------------------
Address 06: Seat Mem. Pass (J521) Labels: None
Part No SW: 8T0 959 760 HW: 8T0 959 760
Component: MEM-BFS H08 0027
Revision: AA000000 Serial number: 00001001007639
Coding: 08217025002444441000
Shop #: WSC 06325 000 00000
VCID: 55A585678025

No fault code found.

-------------------------------------------------------------------------------

Address 36: Seat Mem. Drvr (J136) Labels: None
Part No SW: 8T0 959 760 HW: 8T0 959 760
Component: MEM-FS H08 0027
Revision: AA000000 Serial number: 00001001007641
Coding: 08217025002444441000
Shop #: WSC 00468 210 89792
VCID: 55A585678025

No fault code found.

-------------------------------------------------------------------------------

Address 42: Door Elect, Driver (J386) Labels: 8K0-959-793.clb
Part No SW: 8K0 959 793 HW: 8K0 959 793
Component: TSG FA H08 0149
Revision: Serial number: 0&q
Coding: 011C022250012201
Shop #: WSC 06325 000 00000
VCID: FDF57DC7D8D5

No fault code found.

-------------------------------------------------------------------------------

Address 52: Door Elect, Pass. (J387) Labels: 8K0-959-792.clb
Part No SW: 8K0 959 792 HW: 8K0 959 792
Component: TSG BF H08 0149
Revision: Serial number: 0 q
Coding: 011C022250012201
Shop #: WSC 06325 000 00000
VCID: FCF370C3C3CF

No fault code found.

-------------------------------------------------------------------------------
 
#17 ·
Your VagCom scan should look something like this if you have both modules:

-------------------------------------------------------------------------------
Address 36: Seat Mem. Drvr (J136) Labels: 8T0-959-760.clb
Part No SW: 8T0 959 760 C HW: 8T0 959 760 C
Component: MEM-FS H10 0074
Revision: AA000000 Serial number: 00001010052792
Coding: 00017025002C00000000
Shop #: WSC 06325 000 00000
VCID: 438E8901C282B7007CE

No fault code found.

-------------------------------------------------------------------------------
Address 42: Door Elect, Driver (J386) Labels: 8K0-959-793.clb
Part No SW: 8T0 959 793 J HW: 8T0 959 793 D
Component: TSG FA H07 1201
Revision: -------- Serial number: --------------
Coding: 011C03224000120102
Shop #: WSC 06325 000 00000
VCID: 50A4B64D03F45C98F1C

No fault code found.

-------------------------------------------------------------------------------
 
#22 ·
I fitted the switch and enabled it last weekend in a RHD car.

However, the manual refers to a beep when storing the seat position and the mirror positions also being stored for driver1 and driver2?

Has anyone figured how to enable these features?
 
#24 · (Edited)
Minor success this weekend. I enabled the confirmation beep when setting the memory buttons:

[36 – Seat Mem. Drvr]

[Coding - 07]
Byte 1
Bit 3 = 1

Still can't get the mirrors to recall though :-(

The part numbers of my modules are:
Seat memory module: 8T0 959 760 B
Door module: 8K0 959 793 (full convenience version)

The switch and trim part numbers for a RHD car are:

Door trim 8T2 959 528 A1 <-- you need to get correct colour to match the rest of the door trim
Switch 8T0 959 779 V10 <-- available in any colour you like provided its black
 
#26 ·
Not yet, but just done some digging, and ....

I wonder if the dipping mirror on reverse is clashing with the memory recall? Cars without seat memory use the door controller to "store" the mirror position when dipped. I wonder if I've enabled the controller memory when I enabled the dipping mirror last year.

I'll try and check this weekend.
 
#28 ·
Dual seat memory

Was very pleased to see your post. My A5 being Canadian is LH drive where I assume yours is RH. Can you enlighten us on what parts you purchased? Also, what the original configuration of the car is. Mine has the driver seat memory and the ability to synchronise the two seats. Additionally, the passenger seat automatically returns to the original position after being folded forward to allow access to the rear seat. I assume this is standard on all varieties regardless of country. I am not sure if these functions would indicate that all the memory modules are present and all that is required is a switch block. Something maybe the more experienced users can answer.

Thanks,
look forward to hearing from you and viewing your modification process.

cheers

Jim
 
#29 ·
for some reason when doing my wiring over the past couple of days ive had some issues. all the wiring is correct and done to both this guide and what other members on here have told me to do, have double checked everything but E97 panel is not illuminating what so ever.

So...

Im going to order myself a door loom with seat memory connector from factory in the loom and fit that instead :) then get it coded in and will work fine and dandy.
Only thing holding me back from this is my timing on the decision as now im going to have to wait until tomorrow to order it :(

Part number for anyone who wants to change their loom instead of adding to it is:

8T0 971 029 C - ÂŁ103
 
#31 ·
Update

Hey there,

I am working on the retrofitting of the function as well. My wiring diagramm says, that this is also a connection between door control unit J386 and seat control unit J1236. The connection is T20f/16 to T32g/3. Any ideas on that if this wire is really necessary? Or maybe already installed? Cheers to everybody.
 
#32 ·
If you're lucky then it's already installed. Definitely necessary, relays signals from the buttons to the seat control module, via the door module.

It's a 0.3mm² green thinwall line with a black stripe coming off pin 10 of the 10-pin red plug under your seat. From there it runs along the door sill to the door connector, then inside the door to the door control module.

Hope that helps!
 
#35 ·
Quote:
Originally Posted by llBen
If you're lucky then it's already installed. Definitely necessary, relays signals from the buttons to the seat control module, via the door module.

It's a 0.3mm² green thinwall line with a black stripe coming off pin 10 of the 10-pin red plug under your seat. From there it runs along the door sill to the door connector, then inside the door to the door control module.

Hope that helps!
I would go on a wim and say that if you have the two necessary modules then the wire will be installed already, if not then it will surely be a simple DIY self install with a couple of the wires used in the added wiring done when installing the switch
Under what condition would the wire be already installed? I habe electric seats already, installed from the plant. And with coding I can do seat symetry as well.

Yes, in the wiring diagramm it says, green / red cable. But why is it starting from the T20f connector on PIN 16, and not from the T32j connector at the door control unit. I am not even sure if there is T20f connector (by memory).

@Illben: PIN 10 at the seat control unit? My wiring diagramm says PIN3 on the T32g connector.
 
#36 · (Edited)
Steve, the wire is in 3 sections of that one line spread across multiple wiring diagrams. 20-pin memory unit connector pin 3 to 10-pin red female seat plug pin 10, 10-pin red male seat socket pin 10 (in coupling station under seat) to 27-pin inner door pillar pin 26, 27-pin outer door pillar pin 26 to 32-pin door module pin 1.

Really it's down to luck I'm afraid, I've seen just as many people have it and not have it with their comfort seats. If you have folding mirrors/auto-dimming side mirrors/side assist these all increase your chances of having the correct wiring significantly increase. If you have memory mirrors you will always have this line.
 
#37 · (Edited)
Hi Ben,

now it gets confusing for me with all the stations in between :-(. Let's say we just leave out the middle part, and look only at the door module (J386) and the driver seat modul (J136) - so only the start and the end. I am going to take care, that the wire is somehow routed in between.

According to my wiring diagramm it is like this:

Start: J386 Door module
Connector: T20f => 20 PINs total
Relevant PIN: 16
On picture connector No. 2

End: J136 Driver seat modul
Connector: T32g => 32 PINs total
PIN: 3
On picture connector No. 2 as well

Is that correct?

Edit: Just took a photo of the three connectors as well. No. 2 is the correct one? On PIN3 I got a green wire with a black line. Is the cable that we are looking for?
 

Attachments